为什么使用 Svelte (上) 背景 自2019年Svelte框架横空出世,短短两年时间就迅速占据开发者满意度、开发者兴趣度榜首,
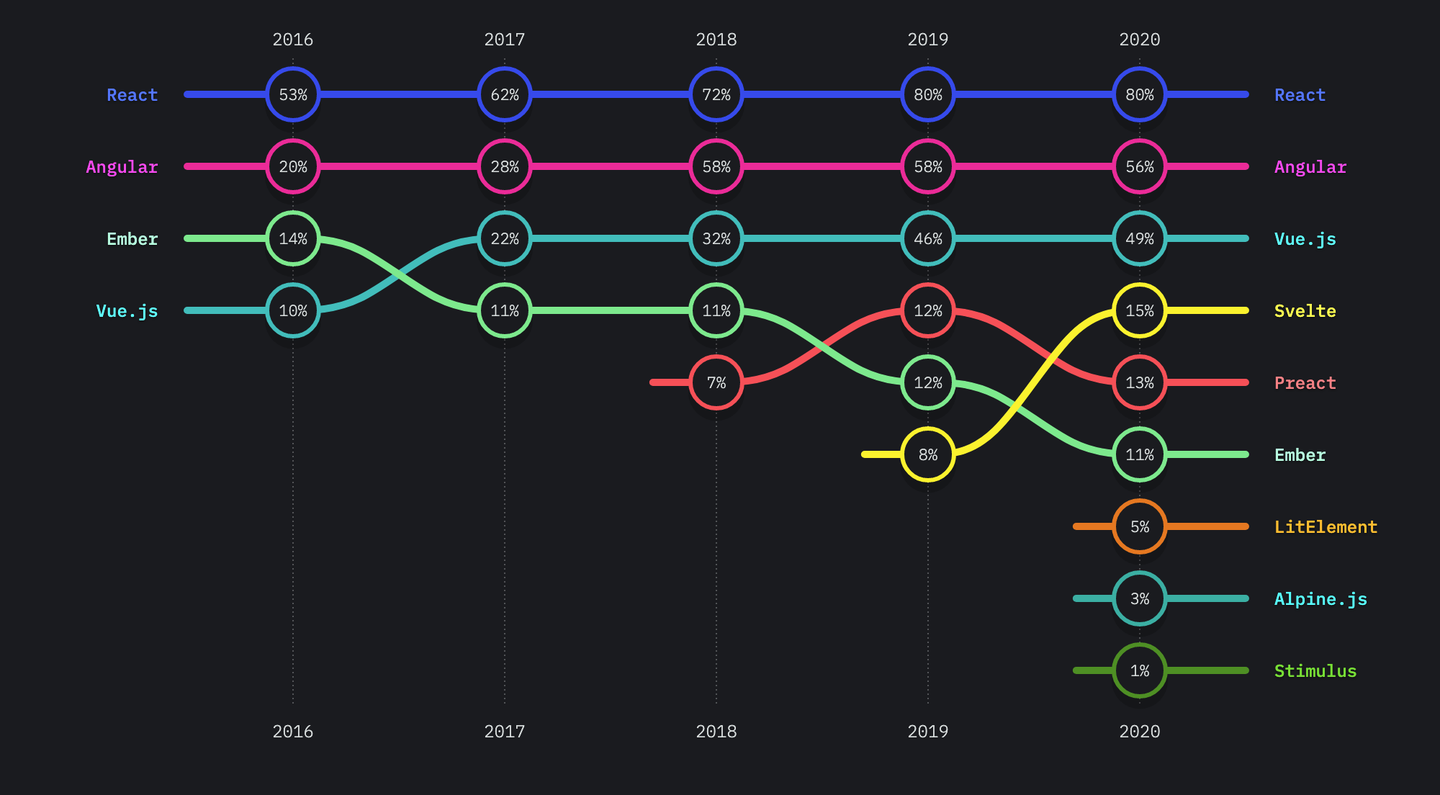
可行性报告 2020数据统计
Svelte 性能整体表现优于 Vue 和 React。在操作大规模 DOM 节点时,性能表现优于基于虚拟 DOM 的 Vue 和 React。 经过 Svelte 编译过的代码体积小,所以在首屏加载时有明显的优势。
类目
Svelte
Vue
React
创建 1000 行表格
132.3 ms
162.3 ms
165.7 ms
创建 10000 行表格
1,212 ms
1,252 ms
1,594.9 ms
在 1000 行表格中交换两行
51.8 ms
66.6 ms
429.6 ms
首屏加载时间
19.5 ms
59.6 ms
55.6 ms
这个网站 统计了现实世界中 Web 应用使用多种 Web 框架构建的相关数据。根据统计,使用一些流行框架的应用经过 gzip 压缩后的大小(KB)分别为:
Angular + ngrx:134
React + Redux:193
Vue:41.8
Svelte:9.7
为什么要用Svelte
svelte是Web 应用程序编译器
Svelte 无需使用虚拟 DOM 就可以提供反应性
Svelte 大大简化了组件和应用程序状态管理
Svelte 为可访问性问题提供了运行时警告
Svelte Native 支持开发移动应用程序
编译型语言在程序执行之前,有一个单独的编译过程,将程序翻译成机器语言,以后执行这个程序的时候,就不用再进行翻译了。
在项目中哪里能用到? 1 2 3 4 5 6 7 8 9 const result = {{{boardParams}}}const boardParams = JSON .parse(result)if (!window .boardParamsConfig) { window .boardParamsConfig = [] } const allTarget = document .querySelectorAll('.use-svelte-target' )const target = allTarget && allTarget[allTarget.length -1 ]boardParams.target = target window .boardParamsConfig.push(boardParams)
测试Svelte
1 2 3 4 5 6 7 8 9 import '../assets/bundle' export default { name: 'HelloWorld' , mounted ( const target = this .$el window .svelteMethods.init({target}) } }
1 2 3 4 5 6 const refSvelte = useRef(null ) useEffect(() => { const target = refSvelte.current window .svelteMethods.init({target}) }, [])
从这里开始 准备工作
clone项目
npx degit sveltejs/template my-svelte-project
或直接下载zip文件 下载地址
使用TS
node scripts/setupTypeScript.js
引入router
npm install svelte-routing –save
1
2
3
4
5
6
7
8
9
import App from './App.svelte' const app = new App({ target: document .getElementById('app' ), + hydratable: true }) export default app
创建路由1 2 3 4 5 6 7 8 9 10 11 12 13 14 15 <script lang="ts" > import { Router, Link, Route } from "svelte-routing" ; import Home from "./routes/Home.svelte" ; export let url: string = "" ; </script> <Router url="{url}" > <nav> <Link to="/" >Home</Link> </nav> <div> <Route path="/" ><Home /> </div> </Router>
此时就可以开始我们的Svelte之旅了,官网 为初学者提供了极度舒适的学习曲线,方便我们学习,同时也可以通过官方示例清晰的了解框架内部运作
走进Svelte
打开svelte源码 我们发现其是由两大部分组成,compiler 和 runtime。
先来看一个例子
会被编译为
1 2 3 4 5 6 7 8 9 10 11 12 13 14 15 16 17 18 19 20 21 22 23 24 25 26 27 28 29 30 31 32 33 34 35 36 37 38 39 import { SvelteComponent, detach, element, init, insert, noop, safe_not_equal } from "svelte/internal" ; function create_fragment (ctx ) let h1; return { c ( h1 = element("h1" ); h1.textContent = "Hello world!" ; }, m (target, anchor ) insert(target, h1, anchor); }, p: noop, i: noop, o: noop, d (detaching ) if (detaching) detach(h1); } }; } class App extends SvelteComponent constructor (options ) super (); init(this , options, null , create_fragment, safe_not_equal, {}); } } export default App;
编译出来的结果就是有一个初始化函数,叫 create_fragment,
1 2 3 4 5 6 7 8 9 10 11 12 13 14 export function element <K extends keyof HTMLElementTagNameMap >(name: K ) return document .createElement<K>(name); } export function text (data: string ) return document .createTextNode(data); } export function space ( return text(' ' ); } export function empty ( return text('' ); }
create_fragment 的过程还包含有c,m,p,i,o,d等特殊名称的函数,这些函数并非编译混淆,而是 Fragment 内部的生命周期缩写。
1 2 3 4 5 6 7 8 9 10 11 12 13 14 15 export interface Fragment { key: string|null ; first: null ; c: () => void ; l: (nodes: any ) => void ; h: () => void ; m: (target: HTMLElement, anchor: any ) => void ; p: (ctx: any, dirty: any ) => void ; r: () => void ; f: () => void ; a: () => void ; i: (local: any ) => void ; o: (local: any ) => void ; d: (detaching: 0 |1 ) => void ; }
再来看一个例子
Nested.svelte
1 <p > This is another paragraph.</p >
App.svelte
1 2 3 4 5 6 7 8 9 10 11 12 13 <script> import Nested from './Nested.svelte' ; </script> <style> p { color: purple; font-family: 'Comic Sans MS' , cursive; font-size: 2em; } </style> <p>This is a paragraph.</p> <Nested/>
会被编译为
1 2 3 4 5 6 7 8 9 10 11 12 13 14 15 16 17 18 19 20 21 22 23 24 25 26 27 28 29 30 31 32 33 34 35 36 37 38 39 40 41 42 43 44 45 46 47 48 49 50 51 52 53 54 55 56 57 58 59 60 61 62 63 64 65 66 67 import { SvelteComponent, attr, create_component, destroy_component, detach, element, init, insert, mount_component, noop, safe_not_equal, space, transition_in, transition_out } from "svelte/internal" ; import Nested from './Nested.svelte' ;function create_fragment (ctx ) let p; let t1; let nested; let current; nested = new Nested({}); return { c ( p = element("p" ); p.textContent = "This is a paragraph." ; t1 = space(); create_component(nested.$$.fragment); attr(p, "class" , "svelte-urs9w7" ); }, m (target, anchor ) insert(target, p, anchor); insert(target, t1, anchor); mount_component(nested, target, anchor); current = true ; }, p: noop, i (local ) if (current) return ; transition_in(nested.$$.fragment, local); current = true ; }, o (local ) transition_out(nested.$$.fragment, local); current = false ; }, d (detaching ) if (detaching) detach(p); if (detaching) detach(t1); destroy_component(nested, detaching); } }; } class App extends SvelteComponent constructor (options ) super (); init(this , options, null , create_fragment, safe_not_equal, {}); } } export default App;
可以看到在对应的fragment声明周期中加入了create_component、mount_component等component的生命周期
1 2 3 4 5 6 7 8 9 10 11 12 13 14 15 16 17 18 19 20 21 22 23 24 25 26 27 28 29 30 31 32 33 34 35 36 37 38 39 40 41 42 43 44 45 export function create_component (block ) block && block.c(); } export function claim_component (block, parent_nodes ) block && block.l(parent_nodes); } export function mount_component (component, target, anchor, customElement ) const { fragment, on_mount, on_destroy, after_update } = component.$$; fragment && fragment.m(target, anchor); if (!customElement) { add_render_callback(() => { const new_on_destroy = on_mount.map(run).filter(is_function); if (on_destroy) { on_destroy.push(...new_on_destroy); } else { run_all(new_on_destroy); } component.$$.on_mount = []; }); } after_update.forEach(add_render_callback); } export function destroy_component (component, detaching ) const $$ = component.$$; if ($$.fragment !== null ) { run_all($$.on_destroy); $$.fragment && $$.fragment.d(detaching); $$.on_destroy = $$.fragment = null ; $$.ctx = []; } }
其实就是调用了fragment的生命周期,所以svelte 的 runtime 主要由 fragment 和 component 组成,而 component 是包含了 fragment。它们有着独立的生命周期,将逻辑层和渲染层分离。
Svelte的数据流是什么样的呢?
1 2 3 4 5 6 7 8 9 10 11 <script> let count = 0 ; function handleClick ( count += 1 ; } </script> <button on:click={handleClick}> Clicked {count} {count === 1 ? 'time' : 'times' } </button>
会被编译为
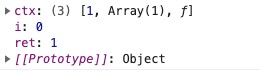
1 2 3 4 5 6 7 8 9 10 11 12 13 14 15 16 17 18 19 20 21 22 23 24 25 26 27 28 29 30 31 32 33 34 35 36 37 38 39 40 41 42 43 44 45 46 47 48 49 50 51 52 53 54 55 56 57 58 59 60 61 62 63 64 65 66 67 68 69 70 71 72 73 74 75 76 77 78 import { SvelteComponent, append, detach, element, init, insert, listen, noop, safe_not_equal, set_data, space, text } from "svelte/internal" ; function create_fragment (ctx ) let button; let t0; let t1; let t2; let t3_value = ( ctx[0 ] === 1 ? 'time' : 'times' ) + "" ; let t3; let mounted; let dispose; return { c ( button = element("button" ); t0 = text("Clicked " ); t1 = text( ctx[0 ]); t2 = space(); t3 = text(t3_value); }, m (target, anchor ) insert(target, button, anchor); append(button, t0); append(button, t1); append(button, t2); append(button, t3); if (!mounted) { dispose = listen(button, "click" , ctx[1 ]); mounted = true ; } }, p (ctx, [dirty] ) if (dirty & 1 ) set_data(t1, ctx[0 ]); if (dirty & 1 && t3_value !== (t3_value = ( ctx[0 ] === 1 ? 'time' : 'times' ) + "" )) set_data(t3, t3_value); }, i: noop, o: noop, d (detaching ) if (detaching) detach(button); mounted = false ; dispose(); } }; } function instance ($$self, $$props, $$invalidate ) let count = 0 ; function handleClick ( $$invalidate(0 , count += 1 ); } return [count, handleClick]; } class App extends SvelteComponent constructor (options ) super (); init(this , options, instance, create_fragment, safe_not_equal, {}); } } export default App;
可以看到,对比不需要进行数据变更的第一个例子,多出了 instance、p两个函数,
查阅源码src/runtime/internal/Component
1
2
3
4
5
6
7
8
9
10
$$.ctx = instance ? instance(component, options.props || {}, (i, ret, ...rest ) => { const value = rest.length ? rest[0 ] : ret; if ($$.ctx && not_equal($$.ctx[i], $$.ctx[i] = value)) { if (!$$.skip_bound && $$.bound[i]) $$.bound[i](value); if (ready) make_dirty(component, i); } return ret; }) : [];
instance 方法会返回一个数组,里面包括组件实例的一些属性和方法。Svelte 会把返回 instance 方法的返回值赋到 ctx 上保存。所以这里的 i 就是 instance 返回的数组下标。
1
2
3
4
5
6
7
8
function make_dirty (component, i ) if (component.$$.dirty[0 ] === -1 ) { dirty_components.push(component); schedule_update(); component.$$.dirty.fill(0 ); } component.$$.dirty[(i / 31 ) | 0 ] |= (1 << (i % 31 )); }
这个方法里面的主流程是把调用 make_dirty 的组件添加到 dirty_components 中,然后调用了 schedule_update 方法。
1
2
3
4
5
6
export function schedule_update ( if (!update_scheduled) { update_scheduled = true ; resolved_promise.then(flush); } }
schedule_update 就是,在 Promise.resolve(microTask) 中调用 flush 方法。
1
2
3
4
5
6
7
export function flush ( for (let i = 0 ; i < dirty_components.length; i += 1 ) { const component = dirty_components[i]; set_current_component(component); update(component.$$); } }
flush 方法,循环调用dirty_components中每个需要更新组件的 update 方法。
1
2
3
4
5
6
7
8
function update ($$ ) if ($$.fragment !== null ) { $$.update(); const dirty = $$.dirty; $$.dirty = [-1 ]; $$.fragment && $$.fragment.p($$.ctx, dirty); } }
调用了fragment的p方法
总结一下
修改数据,调用 $$invalidate 方法
判断是否相等,标记脏数据,make_dirty
在 microTask 中触发更新,遍历所有 dirty_component, 更新 DOM 节点
重置 Dirty
Svelte会消失么 Svelte 库主要由 node_modules/svelte 目录中的.js 文件定义。主要函数在 internal.js 中定义,目前大约有 1400 行代码。
其他库文件则针对特定功能,具体包括:
easing.js
motion.js
register.js
store.js
transition.js
输入 npm run build 会在 public 目录中生成文件,包括 bundle.js。应用程序使用的 Svelte 库函数将复制到 bundle.js 的顶部。后文展示的 Todo 应用程序中,这里大约是 500 行代码。
因此 Svelte 库代码不会消失,只是它与其他 Web 框架相比体积很小。
存在的一些问题
作为组件和外部的通信只能通过window
无法实现跨平台
参考文档硬核基础二进制篇(一)0.1 + 0.2 != 0.3 和 IEEE-754 标准
硬核基础二进制篇(二)位运算