iView 是什么
- iView 是基于 Vue 的 UI 组件库。
- iView 其实和 View UI 是同一个组件库,从 4.0.0 的版本改名为 View UI 。
- iView 2.x 已停止维护,新项目建议大家使用新版本。
重点:
- iView 只是一个 UI 组件库,必须依赖 Vue 框架。
本文介绍的是 iView 4.x 的使用方式,不同版本的使用方式大同小异,组件的使用和参数请参照各自版本的官方文档:
如何搭建一个 iView 项目
iView 项目是什么
iView 项目其实就是在 Vue 项目的基础上引入 iView 组件库,利用 iView 组件原有的样式,可以很快搭建视觉风格统一的页面。
因为 iView 必须依赖 Vue, 所以 iView 项目的搭建方式和 Vue 的搭建方式是密不可分的。和 Vue 项目一样,我们可以通过两种方式来搭建 iView 的项目,一种是 CDN 引入的方式,一种是 npm 安装的方式。
CDN 引入方式
使用 CDN 引入的方式时,直接在 html 页面中引入 css 和 js 文件就行,不需要本地有 node 和 vue 环境。下面是使用 CDN 引入方式的简单示例:
1 |
|
引入静态资源
除了 iView 组件库本身的 css 和 js 文件之外,还需要引入 Vue 的基础库文件。
1 | <!-- iView 的 css 文件 --> |
重点:
- css 文件在前,js 文件在后。
- 使用 unpkg.com 的 CDN 加载速度比较慢,建议将 css 和 js 文件下载下来放到自己的服务器上,再将链接修改为自己服务器提供的静态资源地址。
- 如何指定静态资源的版本:
- Vue:路径中 vue@2.6.14 中 2.6.14 即为 Vue 的版本号。
- iView:如果路径中不加版本号,默认引入的是 iView 的最新版本(目前最新版本为 4.7.0),如果要指定版本,在view-design后增加 @版本号(如://unpkg.com/view-design@4.7.0/dist/iview.min.js )。
- 如果使用的是 iView 2.x 版本,路径中 view-design 应替换为 iview。
创建根节点
1 | <div id="app"></div> |
根节点用于挂载 DOM 元素,Vue 要渲染的内容都会在这个根节点中展示。
创建 Vue 实例
每个 Vue 应用都是通过用 Vue 函数创建一个新的 Vue 实例开始的。Vue 函数的入参是一个对象,用于定义数据、DOM对象、生命周期等,具体配置为:Vue 2.x 配置参数,这里介绍几个常用的:
el
el 提供一个在页面上已存在的 DOM 元素作为 Vue 实例的挂载目标。可以是 CSS 选择器,也可以是一个 HTMLElement 实例。
重点:
- 必须是 new 之前在页面上已经存在的 DOM
- 不推荐挂载到 html 或者 body 上
data
data 用来定义 Vue 实例的数据对象。在渲染模板中使用的数据或者在编写代码时需要保存的变量都要放在 data 里,data 中的对象更新时,页面的 DOM 元素也会相应的进行更新。
重点:
- 由于 Vue 不允许在 data 中动态添加属性,所以必须在初始化实例前声明好 data 的根级属性。
在 Vue 函数内部,可以通过 this.xxx 去更新数据。
1 | new Vue({ |
如果要在 Vue 函数外部使用 data 中的数据,可以先获取到 Vue 的实例(如 vm),通过 vm.xxx 去进行更新。
1 | // 将 vue 示例对象赋值给 vm |
由于 JavaScript 的限制,Vue 不能检测数组和对象的变化。因此在更新数组和对象的时候使用下面的方式来更新:
修改对象
Vue 虽然不允许在 data 中动态添加根级别的属性,但是我们可以使用 $set 方法向嵌套对象添加属性:
1 | <div id="app"> |
$set 方法中,第一个参数为目标对象,第二个为目标对象的属性名(不存在则添加,存在则修改),第三个参数为属性值。
如果要修改 data 中的对象的值,同样可以使用 $set 方法。
1 | <div id="app"> |
除了 $set 方法以外,我们还可以使用 js 的 Object.assign 方法赋值:
1 | <div id="app"> |
修改数组
在 Vue 中,不要直接通过下标来修数组的数据,也不要直接通过 length 来修改数组的长度。
同样的,我们可以使用 $set 方法修改数组(修改数组时,$set 方法的第二个参数为数组下标):
1 | <div id="app"> |
此外,我们还可以使用数组的 slice 和 splice 方法去更新数组:
1 | <div id="app"> |
重点:
- slice 方法不会修改数组本身,需要将结果赋值;spice 方法直接改变数组,不需要赋值
- Array 对象中的方法,concat、push 等方法也可以使用: Vue 数组更新方法
- Array 对象方法参考
methods
methods 保存需要使用的方法。
在模板中使用的方法,必须在 methods 中定义才能使用。
1 | <div id="app"> |
重点:
- 不要使用箭头函数来定义 method 函数 (例如 getCurrentTime: () => {})。因为箭头函数绑定了父级作用域的上下文,this 将不会按照期望指向 Vue 实例,this.xxx 将是 undefined。
编写模板
在编写模板之前,我们先来简单了解下经常用到的 Vue 中的模板语法,更多的语法细节在这里:Vue 模板语法。
模板语法
文本: 数据绑定最常见的形式就是使用双大括号,如 iView 项目分享(搭建)
原始 HTML:双大括号会将数据展示成普通文本,如果我们要展示的是富文本的内容,需要使用 v-html,如下:
1
2
3
4<div>
富文本的内容:
<span v-html="rawHtml"></span>
</div>属性:可以直接在 dom 上添加属性,此时需要注意属性前是否加了: 或者 v-bind:(不加是字符串形式,加的话是 js 表达式)
1
2
3
4
5
6
7
8
9
10
11
12<!-- title 为字符串 mytilte -->
<p title="mytitle"></p>
<!-- title 为 Vue 实例中的对象 mytilte -->
<p :title="mytitle"></p>
<p v-bind:title="mytitle"></p>
<!-- value 为字符串 1 -->
<my-component value="1"></my-component>
<!-- value 为数字类型 1 -->
<my-component :value="1"></my-component>
<!-- 使用 js 表达式赋值 -->
<my-component :value="a > b ? 1 : 2"></my-component>事件:通过在 dom 上使用 v-on:event 或者 @event 添加事件
1 | <button v-on:click="doSomething">click</button> |
- 显示隐藏:可以使用 v-if 或 v-show 控制元素是否展示(v-if 切换时会销毁和重建,v-show 只是改变 css 的 display 属性,频繁切换时使用 v-show)
1 | <h1 v-show="visible">Welcome to ViewUI</h1> |
列表:使用 v-for ,基于数组来渲染一个列表(使用 v-for 时要注意增加 key 属性,key 不可重复,可以是 index 或者 item 中的某个属性值)
1
2
3
4
5
6
7
8
9<!-- items: [
{ message: 'Foo' },
{ message: 'Bar' }
] -->
<ul>
<li v-for="(item, index) in items" :key="index">
{{ item.message }}
</li>
</ul>表单输入绑定:使用 v-model 指令在表单 input、textarea 及 select 元素上创建双向数据绑定。
1
2
3
4
5
6
7
8
9
10
11
12
13
14
15
16
17
18
19
20
21
22
23
24
25
26
27
28
29
30
31
32
33
34
35
36
37
38
39
40
41
42
43
44
45
46
47
48
49
50
51
52
53
54
55
56
57
58
59
60
61
62
63
64
65
66
67
68
69<div id="app">
<h5>输入框-单行文本</h5>
<input v-model="inputValue" placeholder="请输入">
<h5>输入框-多行文本</h5>
<textarea v-model="textareaValue" placeholder="请输入多行文本"></textarea>
<h5>单个复选框</h5>
<!-- 单选时,checked 值为布尔类型 -->
<input type="checkbox" id="checkbox" v-model="checked">
<label for="checkbox">选中结果:{{ checked }}</label>
<h5>多个复选框</h5>
<!-- 不同checkbox 的 v-model 都绑定为 multiChecked,multiChecked 为数组 -->
<input type="checkbox" id="checkbox1" value="1" v-model="multiChecked">
<label for="checkbox1">选项1</label>
<input type="checkbox" id="checkbox2" value="2" v-model="multiChecked">
<label for="checkbox2">选项2</label>
<br>
<span>选中结果: {{ multiChecked }}</span>
<h5>单选按钮</h5>
<input type="radio" id="radio1" value="1" v-model="picked">
<label for="radio1">选项1</label>
<br>
<input type="radio" id="radio2" value="2" v-model="picked">
<label for="radio2">选项2</label>
<br>
<span>选中结果: {{ picked }}</span>
<h5>下拉框-单选</h5>
<!-- 单选时,selected 值为布尔类型 -->
<select v-model="selected">
<option v-for="option in optionList" :key="option.value" :value="option.value">{{option.label}}</option>
</select>
<br>
<span>选中结果: {{ selected }}</span>
<h5>下拉框-多选</h5>
<!-- 多选时,multiSelected 值为数组类型 -->
<select multiple v-model="multiSelected">
<option v-for="option in optionList" :key="option.value" :value="option.value">{{option.label}}</option>
</select>
<br>
<span>选中结果: {{ multiSelected }}</span>
</div>
<script>
new Vue({
el: '#app',
data: {
optionList: [{
label: '选项1',
value: '1'
}, {
label: '选项2',
value: '2'
}],
inputValue: 'input value',
textareaValue: 'textarea value',
checked: true,
multiChecked: ['1', '2'],
picked: '1',
selected: '1',
multiSelected: '1'
},
methods: {
}
})
</script>
模版生成方式
Vue 中有两种生成模板的方式,一种是使用 template,一种是使用 render 方法。
template
使用 template 又可以分为两种情况,一种是和上文中的示例一样,在 el 指定的 DOM 中直接编写模板,另一种是使用在创建 Vue 实例时指定 template 参数:
1 | <div id="app"></div> |
上面的例子使用了 template 字段定义模板,我们也可以将模板单独抽离出来。
1 | <div id="app"></div> |
重点:
- template 中的 DOM 元素只能有一个根节点,如果有多个子节点,可以用 div 包一层
render 方法
Vue 还提供了 render 方法来生成模板,这种方式写起来比较繁琐,入门的话还是推荐使用上面的 template 方式。这里简单介绍下。
render 方法接收一个 createElement 方法作为第一个参数用来创建虚拟 DOM,该方法接收 3个参数,第一个参数是 DOM 节点的类型(div/span 等),第二个参数是节点的属性,第三个参数用来定义该节点的子节点(可以是数组,也可以是文本)。
1 | <div id="app"></div> |
重点:
- 使用 render 方法时要注意 return
- render 方法参考
- 渲染函数中没有与 v-model 的直接对应,而 iView 中的组件大量使用 v-model,因此使用 iView 组件时最好不要使用render 方法
组件
上文中,我们了解了如何创建 Vue 示例并渲染模板,但是实际的工作场景中,有大量的模板内容是可复用的,这时候我们需要将可复用的部分提取为组件。
Vue 中创建组件使用的是 Vue.component 方法,第一个参数是组件的名称,第二个参数是个对象,用于定义组件的 data 和 模板等内容。因为组件是可复用的 Vue 实例,第二个参数与 new Vue 接收相同的选项,例如 data、computed、watch、methods 以及生命周期钩子等。
重点:
- Vue.component 没有 el 这样根实例特有的选项
- Vue.component 的 data 选项必须是一个函数,因此每个实例可以维护一份被返回对象的独立的拷贝
1 | <div id="app"> |
上面的例子中,我们使用 Vue.component 创建了一个名为 button-counter 的组件,之后就可以直接在模板中使用了。下面我们需要让子组件(button-counter) 和 父组件(new Vue 实例)通信。
父组件向子组件传递数据
在 Vue 中,父组件通过 Prop 向子组件传递数据。Prop 可以理解为在自定义组件上添加的属性(拿原生举例:比如 html 标签中的 placeholder),子组件通过在 Vue.component 中定义 props 字段来接收父组件传过来的数据。
1 | <div id="app"> |
子组件向父组件通信
如果子组件需要向父组件传递数据或者触发父组件的方法,可以使用 $emit 方法触发一个事件。$emit 接收两个参数,第一个参数是事件的名称,第二个参数是携带的数据。父组件需要使用 v-on:event 或者 @event 来监听子组件的事件。
1 | <div id="app"> |
重点:
- Vue 的数据流是单向的,父组件传给子组件的 prop 的值发生变化时,子组件接收到的值也会改变,但是子组件只能通过 $emit 事件的触发向父组件传递信息
使用 iView 组件
在对 Vue 和 Vue 组件有了基本的了解之后,我们终于可以使用 iView 组件了。在iView 官网左侧选择好合适的组件后,在页面的右侧,根据自己的需要找到对应的示例就行。
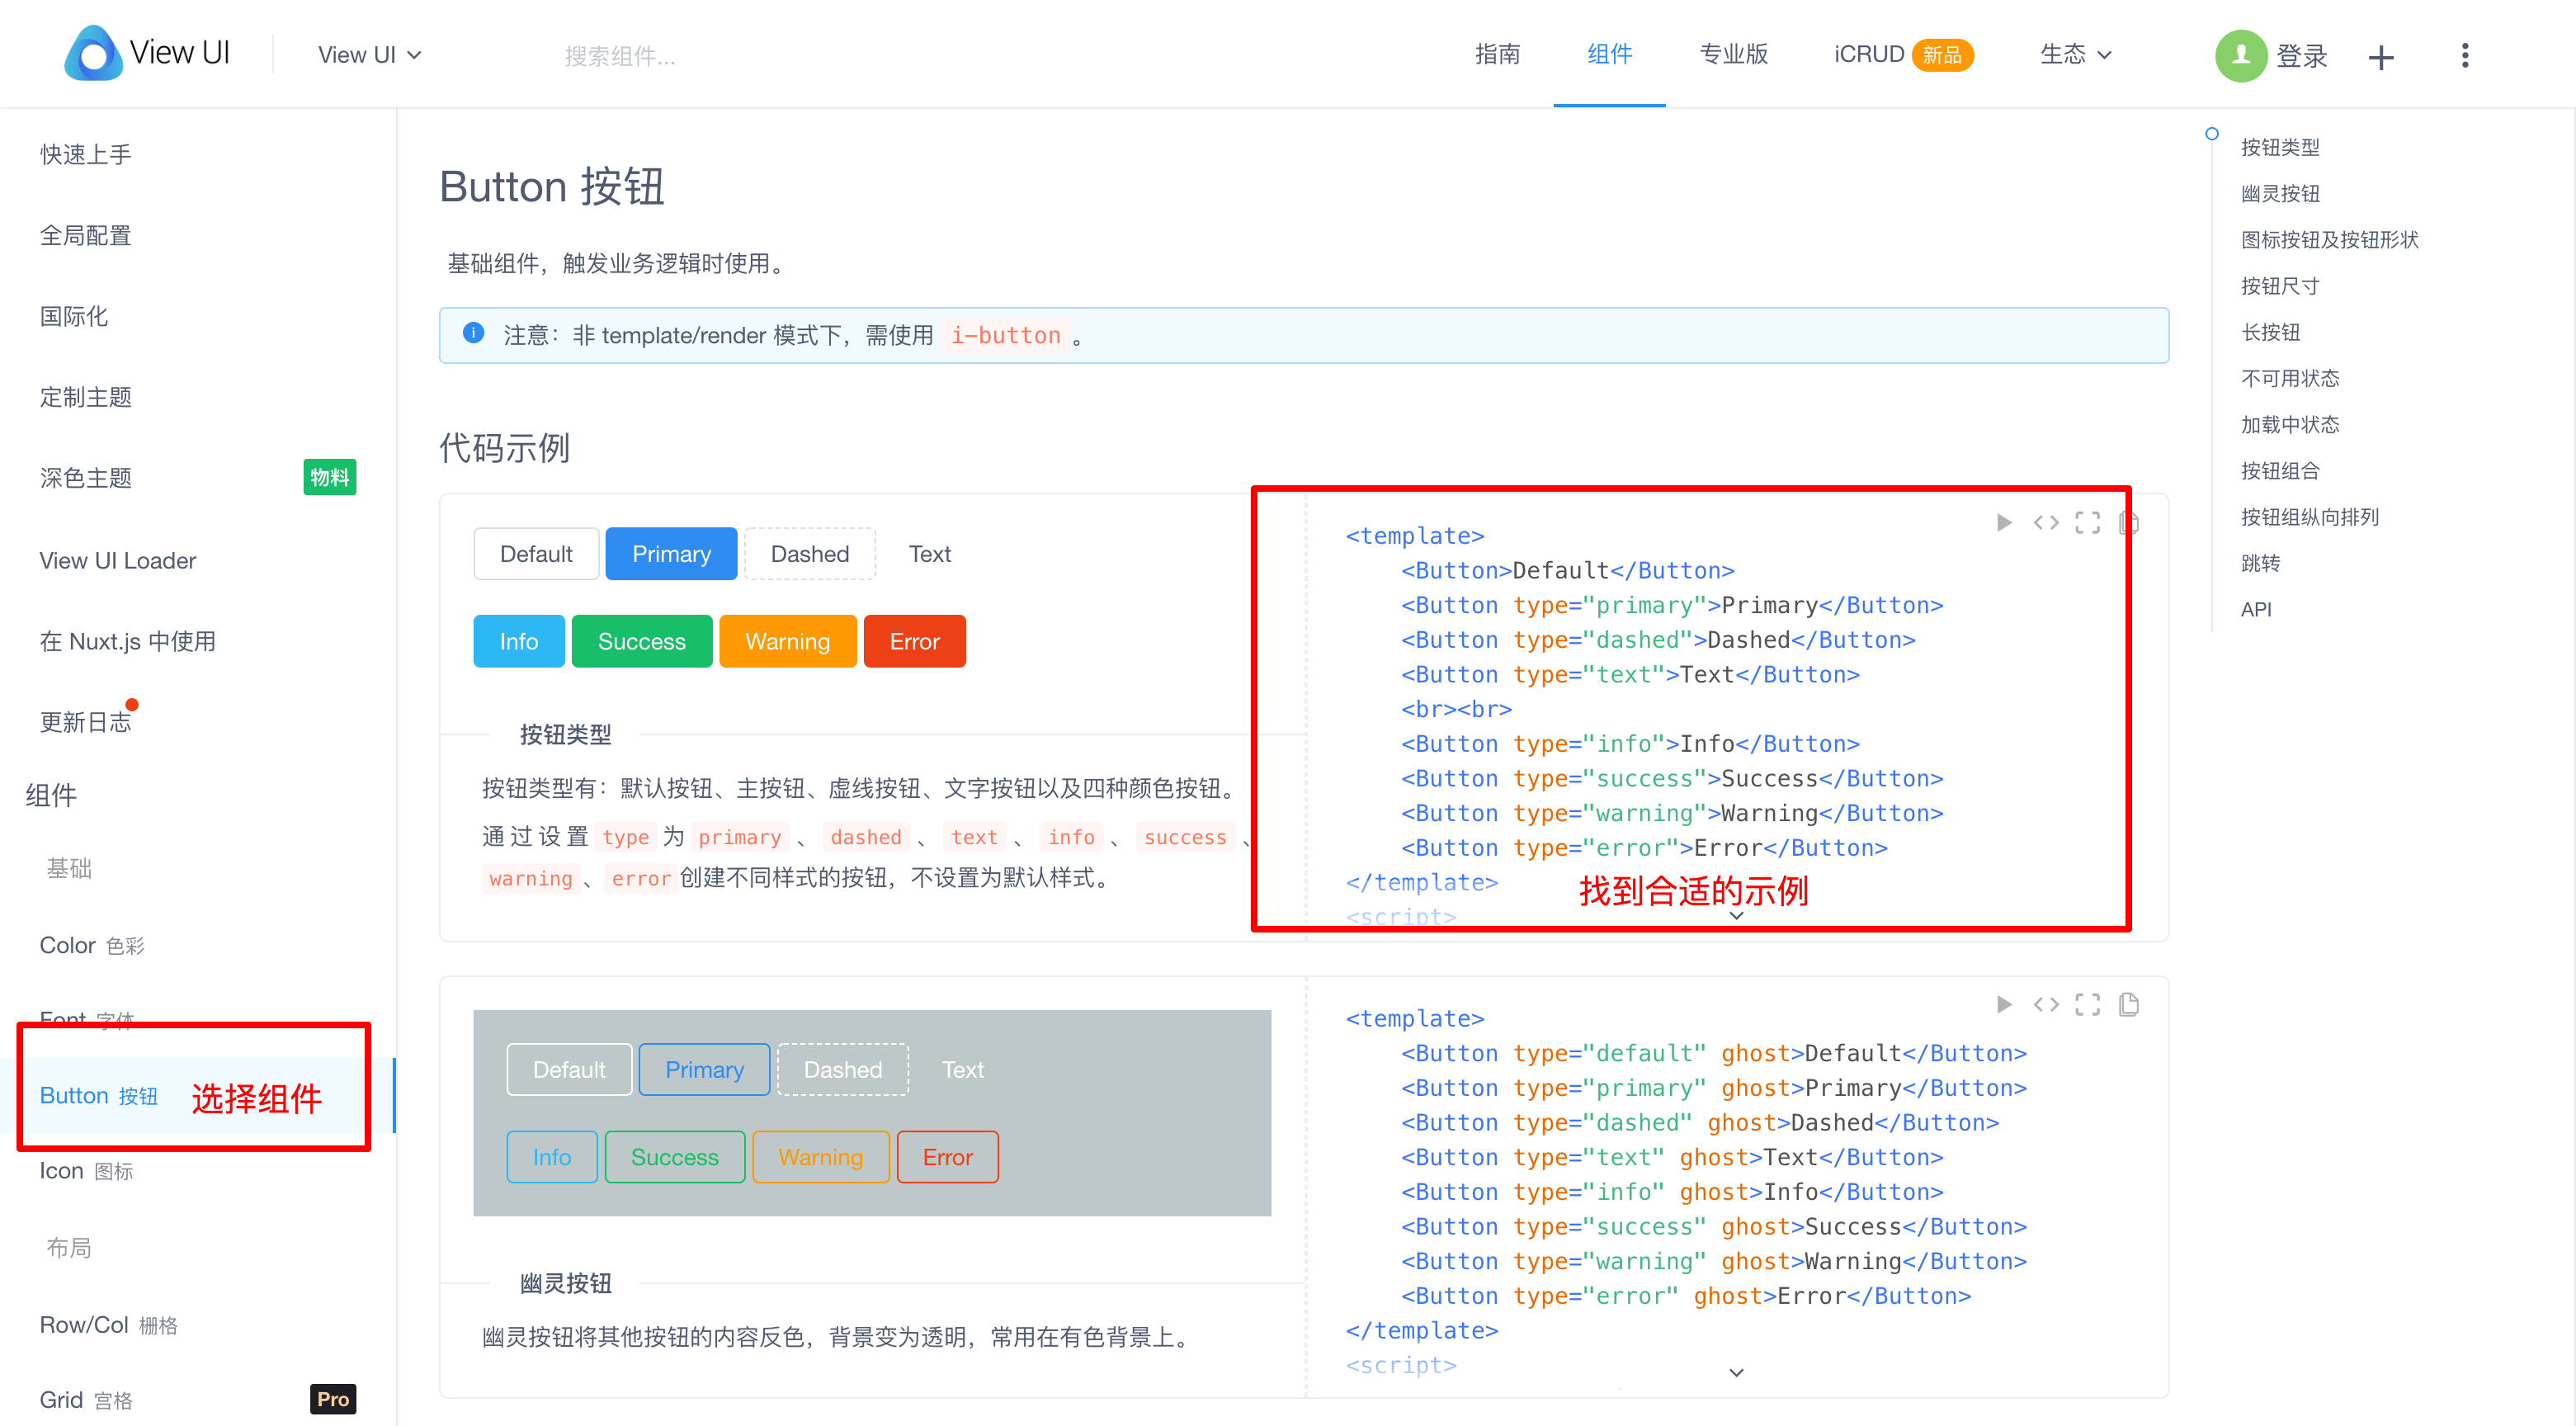
如果上面展示的例子不能满足实际需要,可以在页面的底部的 API 模块找到组件提供的参数和方法(就是上面我们讲过的 prop 和 @event 事件)。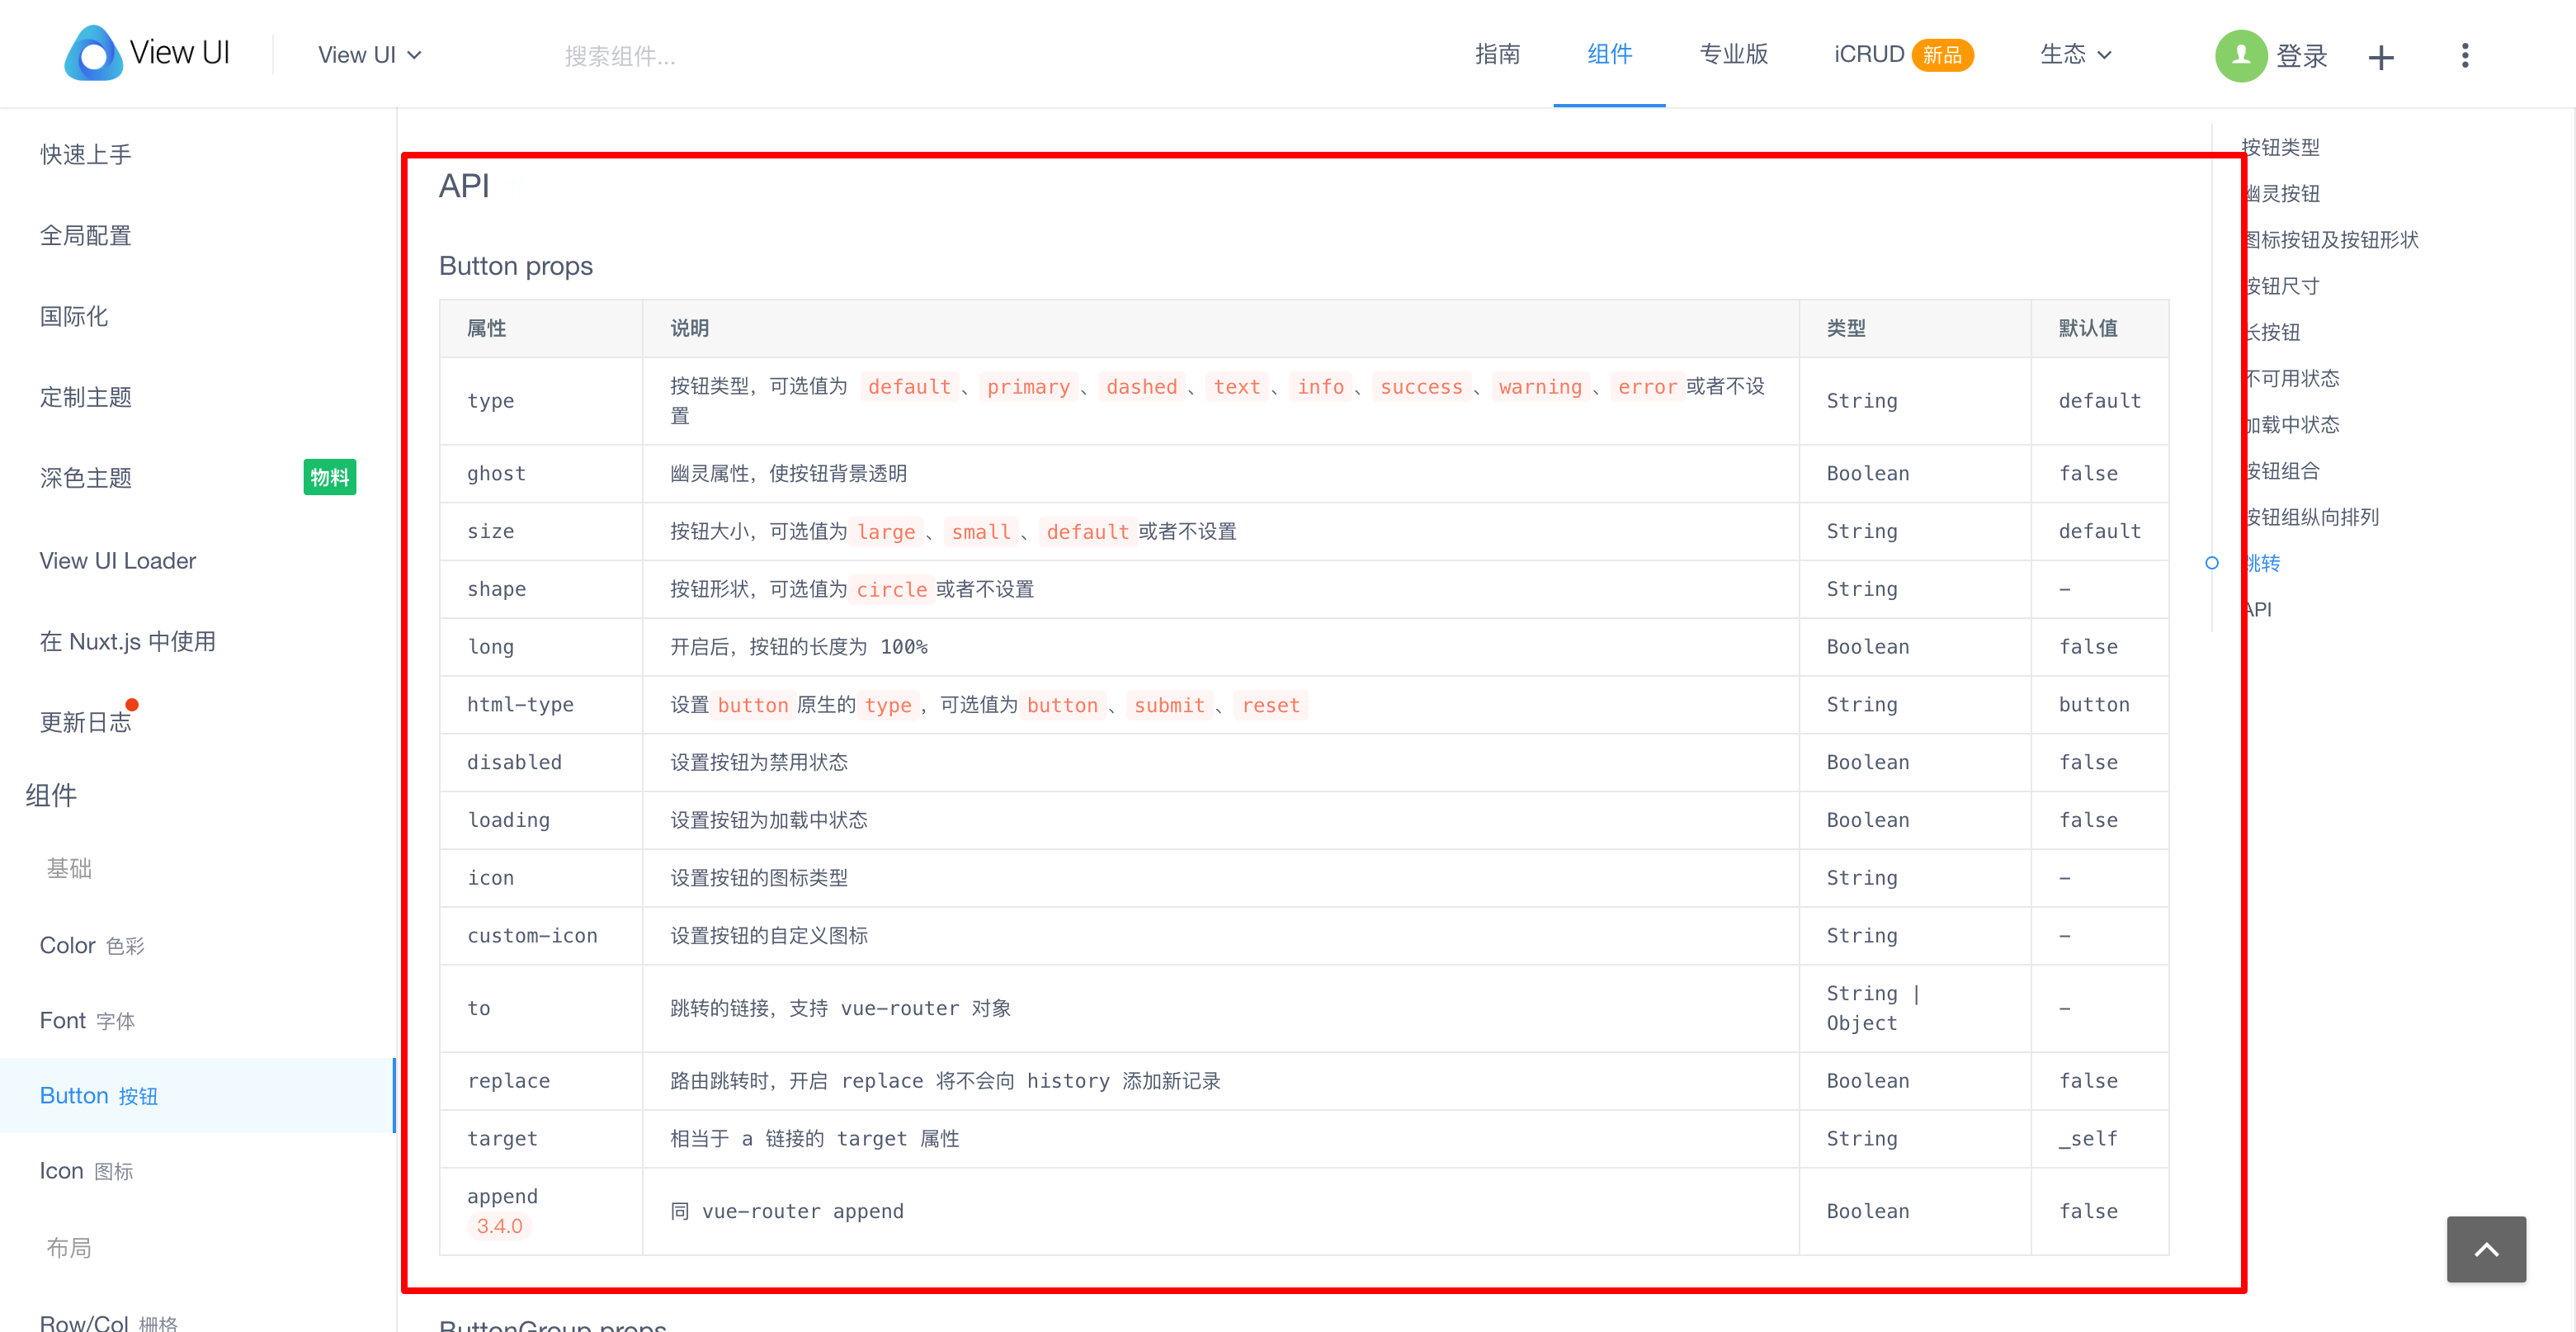
需要注意的是,使用 CDN 引入的方式时,组件的使用不能照搬官网上的示例,比如官网上的按钮使用的是使用 Button 标签,我们需要修改为 i-button:
1 | <!-- 官网的使用方式 --> |
这样做是因为使用 CDN 引入的方式时,iView 有一些规定:
- 在非 template/render 模式下(例如使用 CDN 引用时),组件名要分隔,例如 DatePicker 必须要写成 date-picker。
- 以下组件,在非 template/render 模式下,需要加前缀 i-:
- Button: i-button
- Col: i-col
- Table: i-table
- Input: i-input
- Form: i-form
- Menu: i-menu
- Select: i-select
- Option: i-option
- Progress: i-progress
- Time: i-time
- Switch: i-switch
- Circle: i-circle
npm 安装方式
使用这种方式的话,要依赖于 Vue 的工程化项目。以 Vue 官方提供的脚手架为例,我们先安装好 Vue 的脚手架项目,再在项目中通过 npm 的方式引入 iView。
安装 node
使用 npm 安装方式,首先要有 node 环境,可以在控制台输入 node -v 检查是否安装了node,如果没有提示版本信息,则需要安装下 node 环境。去node 官网下载 node 安装包安装即可。
安装 Vue CLI
Vue CLI 是一个快速搭建 Vue 项目的脚手架工具,可以快速搭建 Vue 开发环境以及对应的 webpack 配置。
node 安装完成后,我们在控制台执行下面的命令,将 Vue CLI 安装到全局环境中。
1 | npm install -g @vue/cli |
安装完成后,可以在命令行中输入 vue --version 命令来检查是否哦安装成功以及对应的版本信息。
新建 Vue 项目
下一步,使用 vue 命令创建一个新项目(示例名称为 vue-demo):
1 | vue create vue-demo |
preset 选默认: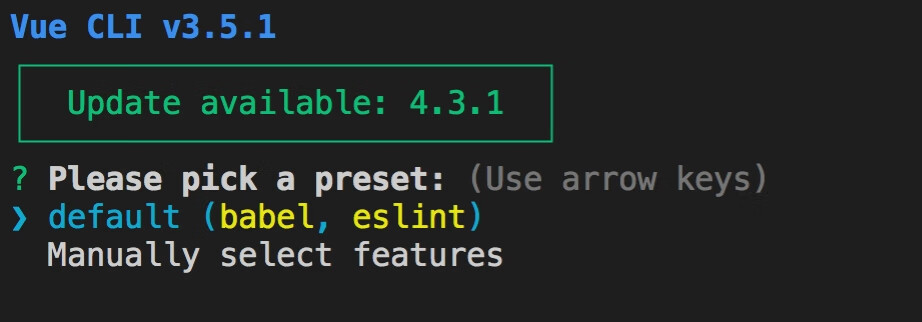
下一步,执行cd vue-demo 打开项目根目录,再次执行 npm run serve启动项目,启动成功后,控制台会提示页面地址:
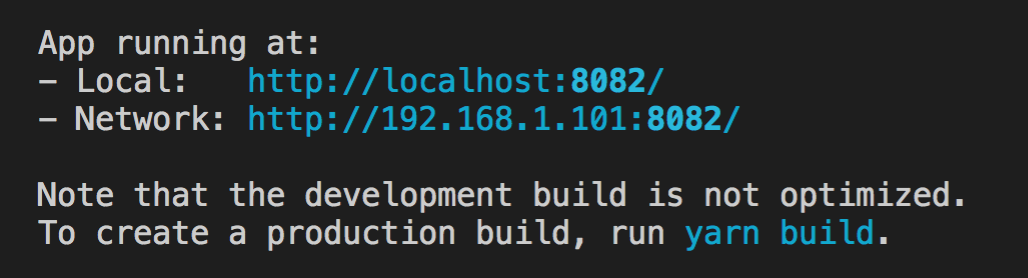
访问这个链接就可以看到项目提供的示例页面了:
关于 Vue CLI 脚手架生成的项目,有几个文件需要关注下:
- public/index.html:页面的 html 文件模板,文件中的
<div id="app"></div>用于挂在 Vue 的实例(这里不需要像 CDN 引入方式一样在 html 中引入 css 和 js,webpack 会自动把 css 和 js 插入到 html 页面中去的) - package.json:定义这个项目所需要的各种模块和项目的配置信息(比如名称、版本、许可证等元数据)。dependencies 和 devDependencies 定义了项目依赖的 npm 包(我们执行 npm install 时会按照这两个字段的内容去安装对应的 npm 包);scripts 指定了运行脚本命令的npm命令行缩写,我们可以从这里找到项目运行的命令(比如 npm run serve)
- src/main.js:webpack 打包的入口文件,各个模块都是从这里一步步引入的
引入 iView
要在 Vue 项目中使用 iView,首先要安装 iView 的 npm 包:
1 | npm install view-design --save |
在 main.js 中加入如下代码:
1 | import ViewUI from 'view-design'; |
之后,就可以和官网上的示例一样使用 iView 的各个组件了。因为 Vue CLI 的脚手架默认是没有使用 iView-loader,因此下面的两个组件不能直接使用示例中的 Switch 和 Circle 标签,需要在前面加 i-:
- Switch: i-switch
- Circle: i-circle
如果要使用 Switch 和 Circle 标签,需要在项目中配置 iView-loader (涉及到 Vue 的自定义配置,这里不再扩展):iview-loader 配置
代码编写
在 Vue 项目中,后缀为 .vue 的文件其实是一个个的 Vue 组件(对应上文讲过的 Vue.component),其中 template 是模板部分,style 是样式部分,script 用来定义组件的数据、方法等。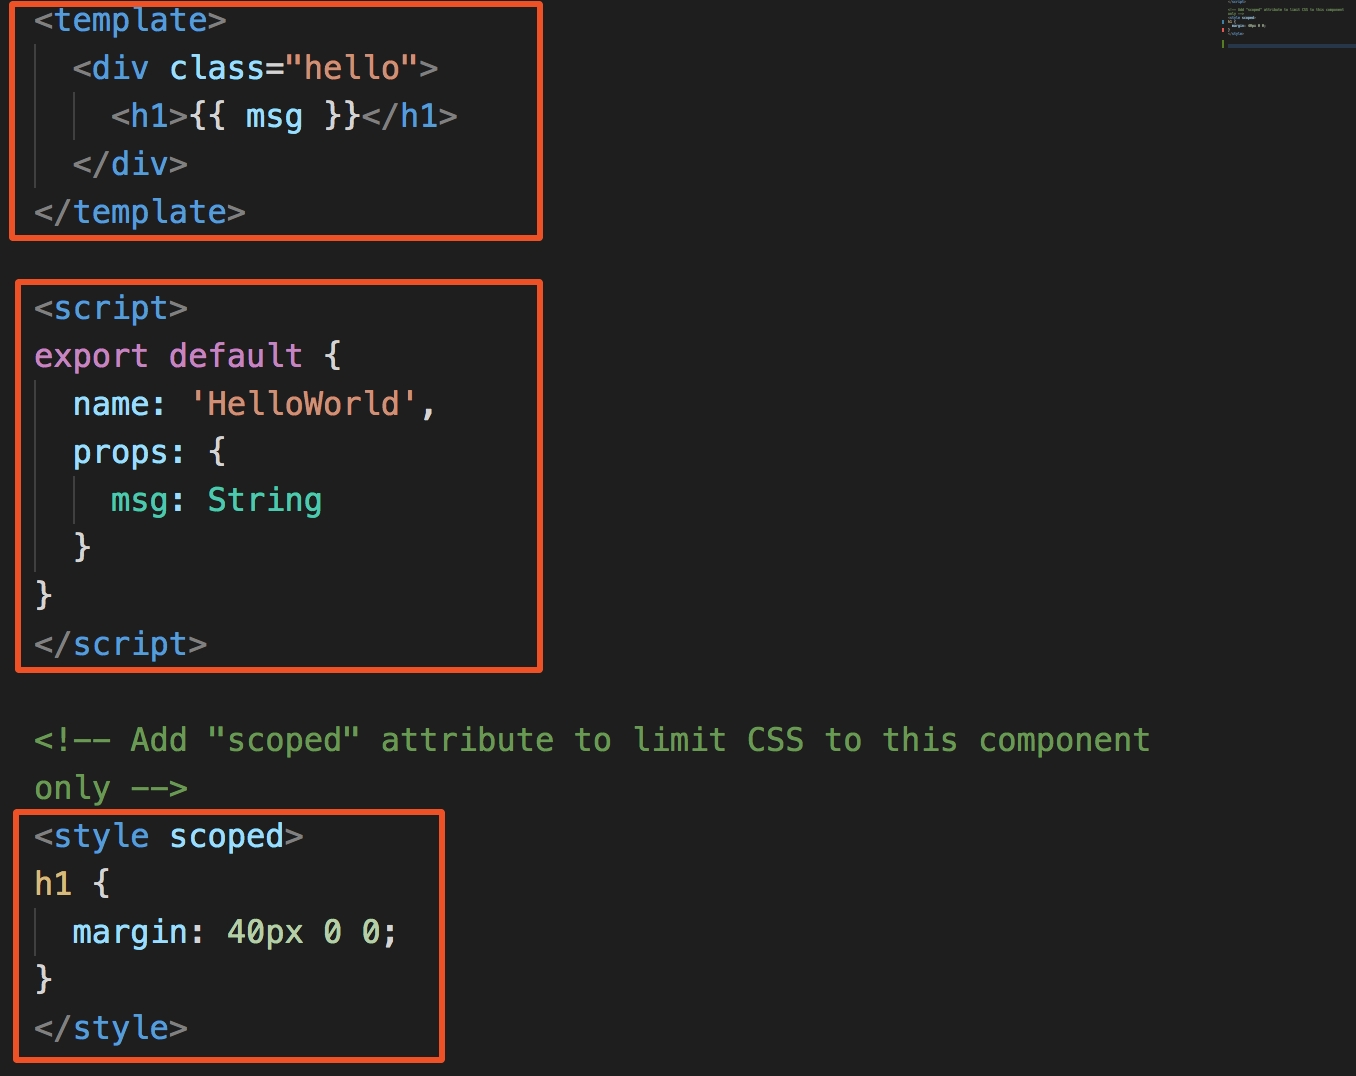
我们来回顾下使用 Vue.component 创建组件时,两个参数一个是组件名称,一个是组件的配置项。在 .vue 文件中,组件名称对应为 script 标签中的 name 字段,配置项中的 template 字段对应为 template 的内容,其他的和 Vue.component 保持一致。需要注意的是,.vue 中,如果要使用组件,需要先在 script 中的 components 中定义才能在 template 中使用:
1 | <template> |
因为 Vue.use(ViewUI) 将 iView 的组件定义为全局,所以使用 iView 组件时可以直接使用,不需要在 components 中定义:
1 | <template> |